Spaces:
Sleeping

Sleeping
| # Image Classification & Regression | |
| Image classification is a form of supervised learning where a model is trained to identify | |
| and categorize objects within images. AutoTrain simplifies the process, enabling you to | |
| train a state-of-the-art image classification model by simply uploading labeled example | |
| images. | |
| Image regression/scoring is a form of supervised learning where a model is trained to predict a | |
| score or value for an image. AutoTrain simplifies the process, enabling you to train a | |
| state-of-the-art image scoring model by simply uploading labeled example images. | |
| ## Preparing your data | |
| To ensure your image classification model trains effectively, follow these guidelines for preparing your data: | |
| ### Organizing Images For Image Classification | |
| Prepare a zip file containing your categorized images. Each category should have its own | |
| subfolder named after the class it represents. For example, to differentiate between | |
| 'cats' and 'dogs', your zip file structure should resemble the following: | |
| ``` | |
| cats_and_dogs.zip | |
| ├── cats | |
| │ ├── cat.1.jpg | |
| │ ├── cat.2.jpg | |
| │ ├── cat.3.jpg | |
| │ └── ... | |
| └── dogs | |
| ├── dog.1.jpg | |
| ├── dog.2.jpg | |
| ├── dog.3.jpg | |
| └── ... | |
| ``` | |
| You can also use a dataset from the Hugging Face Hub. Example dataset from Hugging Face Hub: [truepositive/hotdog_nothotdog](https://huggingface.co/datasets/truepositive/hotdog_nothotdog). | |
| ### Organizing Images for Image Regression/Scoring | |
| Prepare a zip file containing your images and metadata.jsonl. | |
| ``` | |
| Archive.zip | |
| ├── 0001.png | |
| ├── 0002.png | |
| ├── 0003.png | |
| ├── . | |
| ├── . | |
| ├── . | |
| └── metadata.jsonl | |
| ``` | |
| Example for `metadata.jsonl`: | |
| ``` | |
| {"file_name": "0001.png", "target": 0.5} | |
| {"file_name": "0002.png", "target": 0.7} | |
| {"file_name": "0003.png", "target": 0.3} | |
| ``` | |
| Please note that metadata.jsonl should contain the `file_name` and the `target` value for each image. | |
| You can also use a dataset from the Hugging Face Hub. Example dataset from Hugging Face Hub: [abhishek/img-quality-full](https://huggingface.co/datasets/abhishek/img-quality-full). | |
| ### Image Requirements | |
| - Format: Ensure all images are in JPEG, JPG, or PNG format. | |
| - Quantity: Include at least 5 images per class to provide the model with sufficient examples for learning. | |
| - Exclusivity: The zip file should exclusively contain folders named after the classes, | |
| and these folders should only contain relevant images. No additional files or nested | |
| folders should be included. | |
| ** Additional Tips** | |
| - Uniformity: While not required, having images of similar sizes and resolutions can help improve model performance. | |
| - Variability: Include a variety of images for each class to encompass the range of | |
| appearances and contexts the model might encounter in real-world scenarios. | |
| Some points to keep in mind: | |
| - The zip file should contain multiple folders (the classes), each folder should contain images of a single class. | |
| - The name of the folder should be the name of the class. | |
| - The images must be jpeg, jpg or png. | |
| - There should be at least 5 images per class. | |
| - There must not be any other files in the zip file. | |
| - There must not be any other folders inside the zip folder. | |
| When train.zip is decompressed, it creates two folders: cats and dogs. these are the two categories for classification. The images for both categories are in their respective folders. You can have as many categories as you want. | |
| ## Column Mapping | |
| For image classification, if you are using a `zip` dataset format, the column mapping should be default and should not be changed. | |
| ```yaml | |
| data: | |
| . | |
| . | |
| . | |
| column_mapping: | |
| image_column: image | |
| target_column: label | |
| ``` | |
| For image regression, the column mapping must be as follows: | |
| ```yaml | |
| data: | |
| . | |
| . | |
| . | |
| column_mapping: | |
| image_column: image | |
| target_column: target | |
| ``` | |
| For image regression, `metadata.jsonl` should contain the `file_name` and the `target` value for each image. | |
| If you are using a dataset from the Hugging Face Hub, you should set appropriate column mappings based on the dataset. | |
| ## Training | |
| ### Local Training | |
| To train the model locally, create a configuration file (config.yaml) with the following content: | |
| ```yaml | |
| task: image_classification | |
| base_model: google/vit-base-patch16-224 | |
| project_name: autotrain-cats-vs-dogs-finetuned | |
| log: tensorboard | |
| backend: local | |
| data: | |
| path: cats_vs_dogs | |
| train_split: train | |
| valid_split: null | |
| column_mapping: | |
| image_column: image | |
| target_column: label | |
| params: | |
| epochs: 2 | |
| batch_size: 4 | |
| lr: 2e-5 | |
| optimizer: adamw_torch | |
| scheduler: linear | |
| gradient_accumulation: 1 | |
| mixed_precision: fp16 | |
| hub: | |
| username: ${HF_USERNAME} | |
| token: ${HF_TOKEN} | |
| push_to_hub: true | |
| ``` | |
| Here, we are using `cats_and_dogs` dataset from Hugging Face Hub. The model is trained for 2 epochs with a batch size of 4 and a learning rate of `2e-5`. We are using the `adamw_torch` optimizer and the `linear` scheduler. We are also using mixed precision training with a gradient accumulation of 1. | |
| In order to use a local dataset, you can change the `data` section to: | |
| ```yaml | |
| data: | |
| path: data/ | |
| train_split: train # this folder inside data/ will be used for training, it contains the images in subfolders. | |
| valid_split: valid # this folder inside data/ will be used for validation, it contains the images in subfolders. can also be null. | |
| column_mapping: | |
| image_column: image | |
| target_column: label | |
| ``` | |
| Similarly, for image regression, you can use the following configuration file: | |
| ```yaml | |
| task: image_regression | |
| base_model: microsoft/resnet-50 | |
| project_name: autotrain-img-quality-resnet50 | |
| log: tensorboard | |
| backend: local | |
| data: | |
| path: abhishek/img-quality-full | |
| train_split: train | |
| valid_split: null | |
| column_mapping: | |
| image_column: image | |
| target_column: target | |
| params: | |
| epochs: 10 | |
| batch_size: 8 | |
| lr: 2e-3 | |
| optimizer: adamw_torch | |
| scheduler: cosine | |
| gradient_accumulation: 1 | |
| mixed_precision: fp16 | |
| hub: | |
| username: ${HF_USERNAME} | |
| token: ${HF_TOKEN} | |
| push_to_hub: true | |
| ``` | |
| To train the model, run the following command: | |
| ```bash | |
| $ autotrain --config config.yaml | |
| ``` | |
| This will start the training process and save the model to the Hugging Face Hub after training is complete. In case you dont want to save the model to the hub, you can set `push_to_hub` to `false` in the configuration file. | |
| ### Training on Hugging Face Spaces | |
| To train the model on Hugging Face Spaces, create a training space as described in `Quickstart` section. | |
| An example UI for training an image scoring model on Hugging Face Spaces is shown below: | |
| 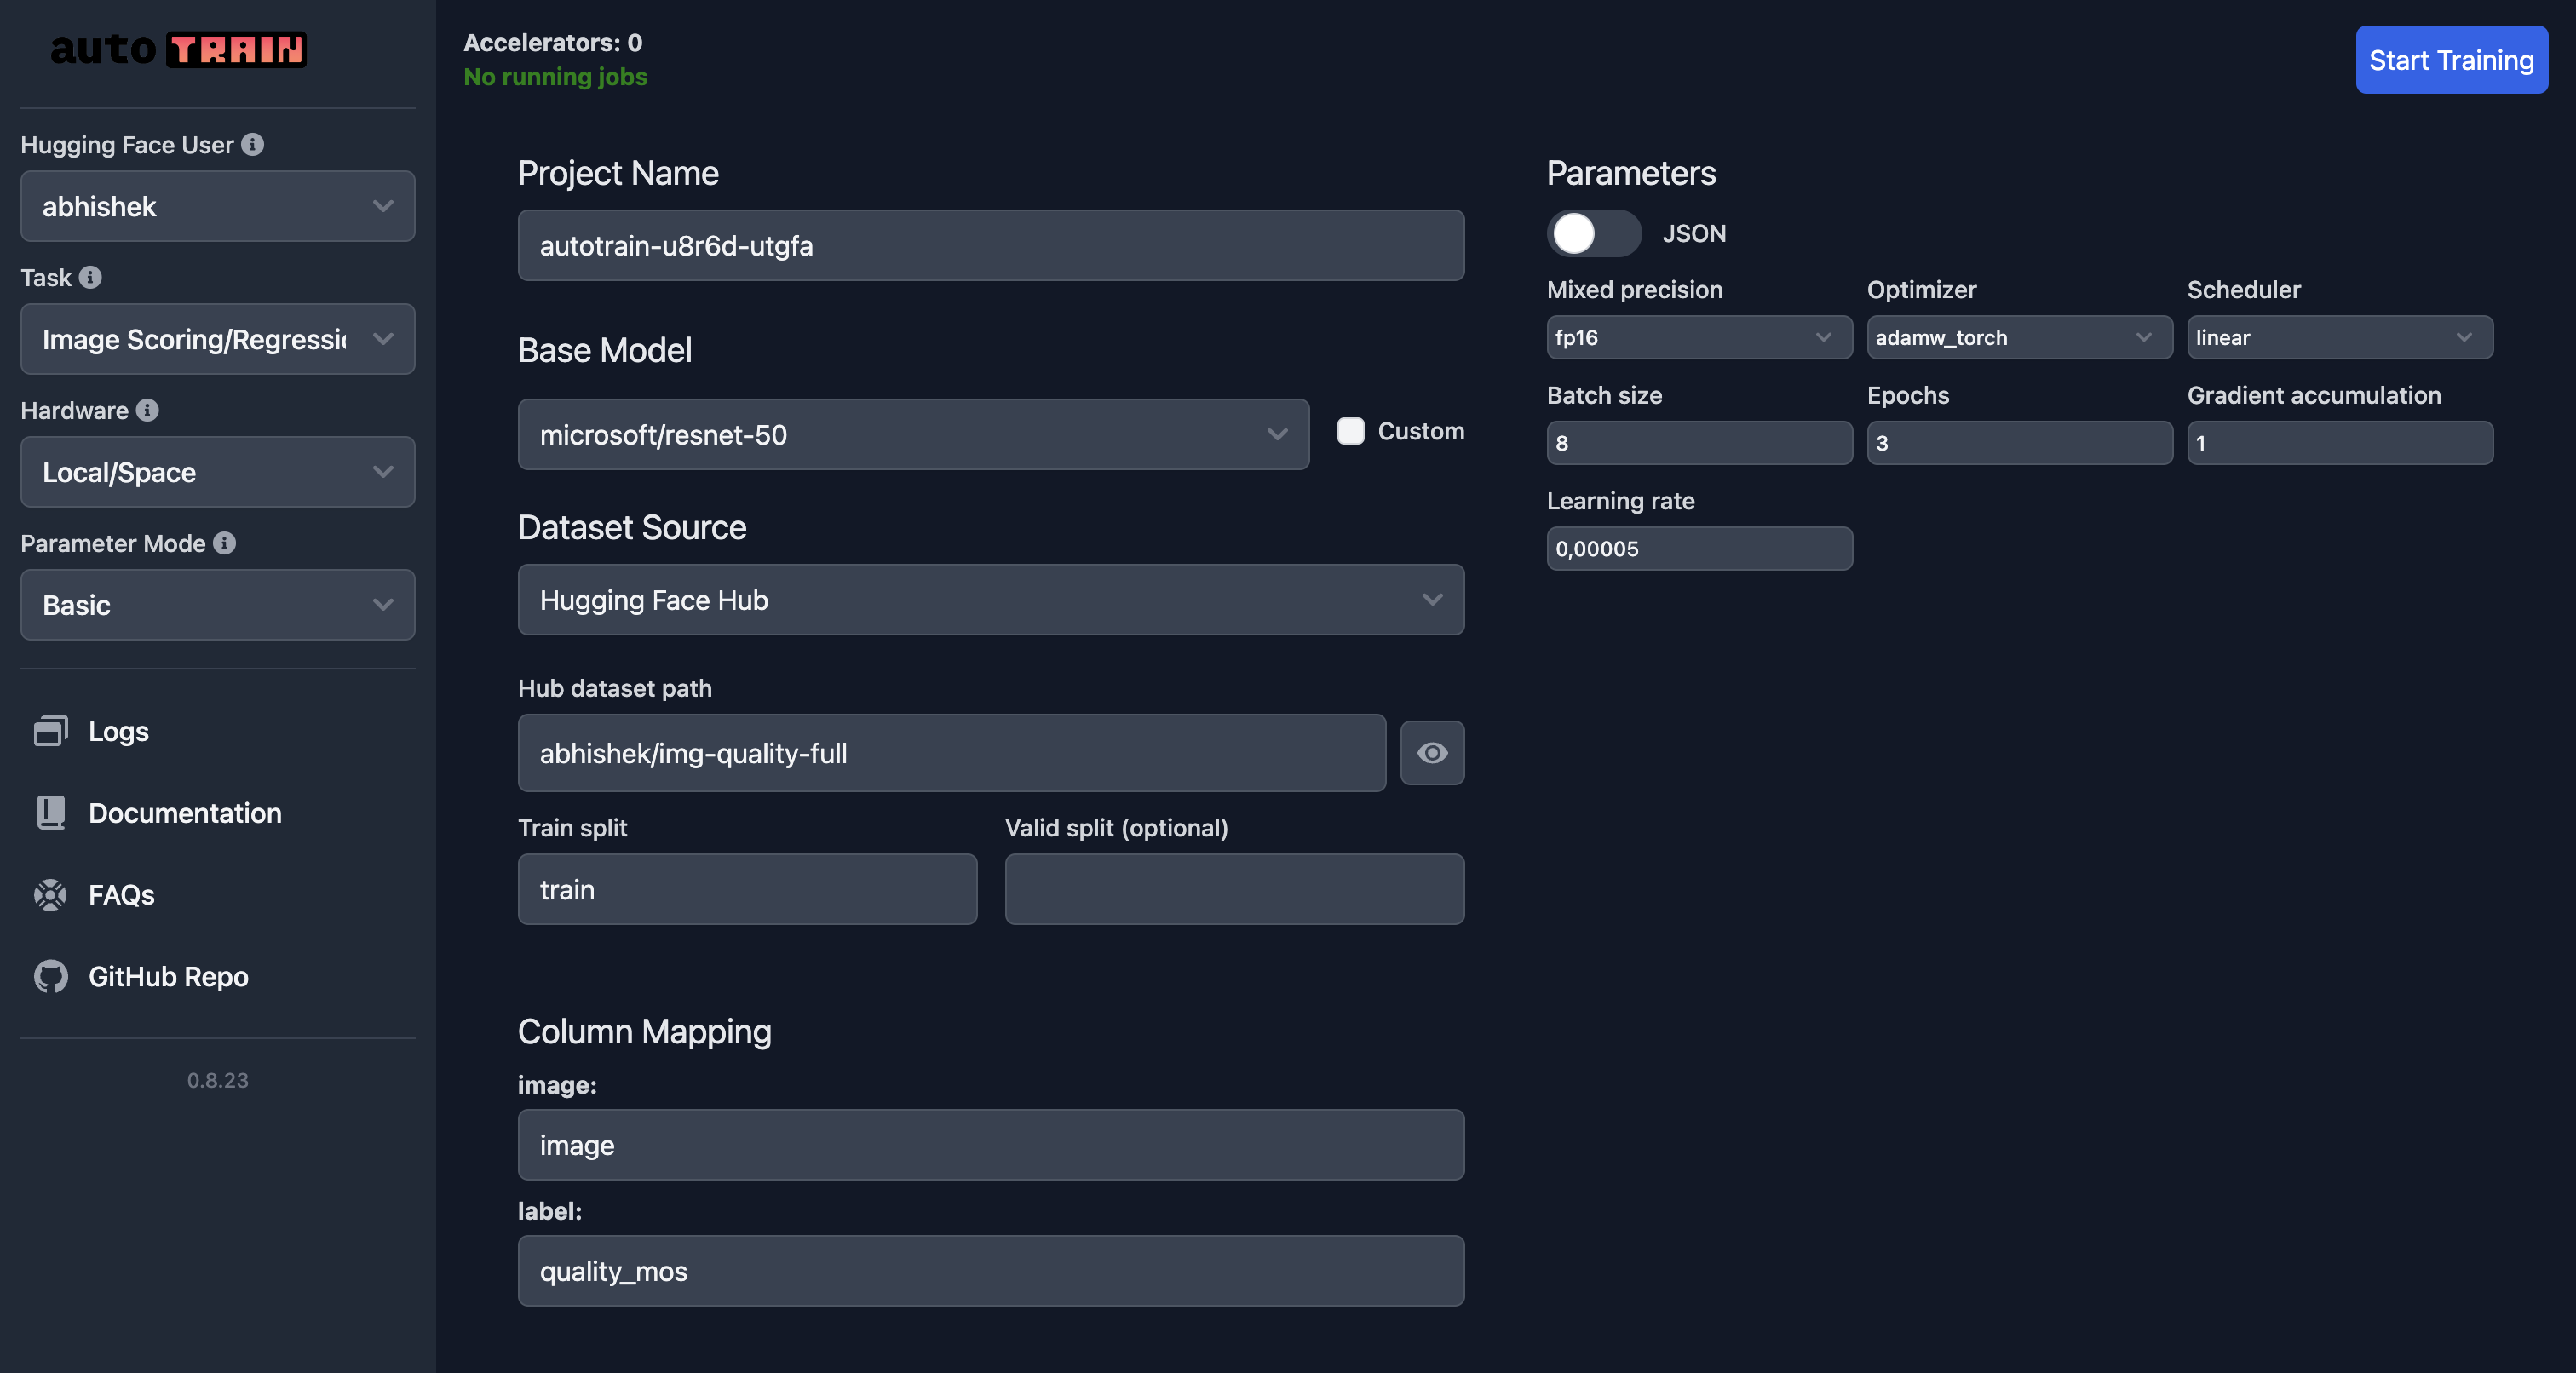 | |
| In this example, we are training an image scoring model using the `microsoft/resnet-50` model on the `abhishek/img-quality-full` dataset. | |
| We are training the model for 3 epochs with a batch size of 8 and a learning rate of `5e-5`. | |
| We are using the `adamw_torch` optimizer and the `linear` scheduler. | |
| We are also using mixed precision training with a gradient accumulation of 1. | |
| Note how the column mapping has now been changed and `target` points to `quality_mos` column in the dataset. | |
| To train the model, click on the `Start Training` button. This will start the training process and save the model to the Hugging Face Hub after training is complete. | |
| ## Parameters | |
| ### Image Classification Parameters | |
| [[autodoc]] trainers.image_classification.params.ImageClassificationParams | |
| ### Image Regression Parameters | |
| [[autodoc]] trainers.image_regression.params.ImageRegressionParams |